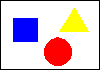
sample.gif
STEP 1
Of Course, you have to prepare an image for map, just like the left one, 'sample.gif'. Then execute Map This!
Select File/New to create a new map. A dialog box will appear and ask you if you want to choose an exist image file for map. Choose Okay, and then open the image we have created in advance.
rectangle
circle
polygon
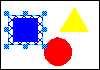
STEP 2
After selecting the image. You will see the image and some tools will be displayed in the window. The first three tools are for creating areas. You have three choices (rectangle, circle, or polygon) of the shape of the area. To use the rectangle and the circle tools, just press its button, click and draw your mouse on the map image.
![]()
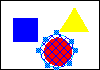
The operation of the polygon tool (the third button) is a little complex. Click the left mouse button to create the first point. Then move you mouse and click again to make the second point. Repeat this operation and double-click the left mouse button to close the polygon. Try it several times and you will know how to use it.
After creating some areas, you may want to adjust theirs size or position,
and even delete them. The fourth button![]() ,
Arrow tool allow you to adjust the areas. If you want to remove
an area, just click the left mouse button on the area and press
,
Arrow tool allow you to adjust the areas. If you want to remove
an area, just click the left mouse button on the area and press![]() button
or DEL key.
button
or DEL key.
STEP 3
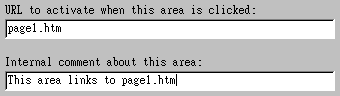
The first column is the URL which the area links. In this case, the area will link to page1.htm. The second one is the comment about this link. You can input anything you like, just like the example. Repeat Step 3 until all area are set correctly.
STEP 4
Select Mapping/Edit Map Info , and another dialog box appears.
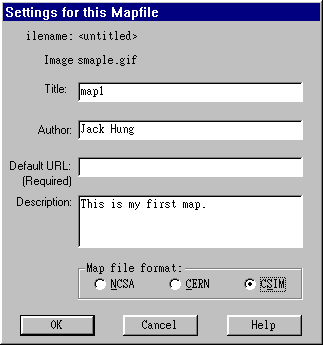
Title is the name of your map. It will be used in our page later. Name it anything you like.
Author is your name. You can ignore this option.
Default URL is the location to which map will link when user click the undefined area of the image. You can ignore this, too.
Description is the comment about this map. You can ignore it.
Map file format must be CSIM.
STEP 5
![]()
Choose HTML as File Format, and save your work into a html file where you use the map, for example, mapfile.htm. Let we check out mapfile.htm.
<BODY>
<MAP NAME="map1">
<!-- #$-:Image Map file created by Map
THIS! -->
<!-- #$-:Map THIS! free image map editor by Todd C. Wilson -->
<!-- #$-:Please do not edit lines starting with "#$" -->
<!-- #$VERSION:1.30 -->
<!-- #$DESCRIPTION:This is my first map. -->
<!-- #$AUTHOR:Jack Hung -->
<!-- #$DATE:Sat Aug 30 03:48:38 1997 -->
<!-- #$PATH:C:\Myfile\Mypage\graphic\Map\ -->
<!-- #$GIF:smaple.gif -->
<AREA SHAPE=RECT COORDS="9,16,42,44"
HREF="page1.htm">
<AREA SHAPE=CIRCLE COORDS="57,50,18" HREF="page2.htm"
ALT="This area links to page2.htm">
<AREA SHAPE=POLY COORDS="71,6,50,38,91,37,71,6" HREF="page3.htm">
</MAP></BODY>
The Lines start with <!-- is just for comment, and the map still works without them. Let we examine the last 2-4 lines. Map This! created the areas position data automatically. It will take us lots of time to compute this data without this program.
STEP 6
Now we have had the data we want. To use the data, add the following line into mapfile.htm. The left is the result.
<IMG SRC="sample.gif" USEMAP="#map1" BORDER=0>
If you want to use these map data in other html files, copy the map data (from <MAP NAME="map1"> to </MAP> section) into new html files.