
mask.gif

image.gif
STEP 1
Apply what you learned in Basic Skill to generate the left two images. You can also use File/Open... to open these images if you have saved them before.
Make sure the two images are both of true color,if they are not, use Colors/Increase Color Depth/16 million colors to translate them to true color.
In this example, the filename of image I opened is mask.gif and image.gif.

image.gif
STEP 2
Choose Colors/Colorize... to add foreground color to image.gif.
I chose red color and the result is the left. Besides using Colorize, you can use Colors/Adjust/Hue/Saturation/luminance... to add color. You are allowed to modify the brightness in addition.
STEP 3
Make sure the window of image.gif is active. Then choose Image/Add Mask... to add mask. The mask image is mask.gif. The following is the setting.
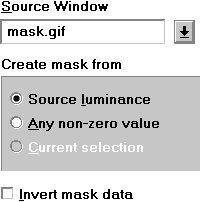 |
Source Window is the filename of mask image.
Choose Source luminance. Don't check Invert mask data.
|

image.gif
STEP 4
Add color to image.gif again. This time the color we add is the background color. I chose dark purple and the result is the left.

mask2.gif

image.gif
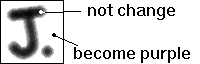
What is mask?
If you look carefully, you may notice something interesting. Purple
color wasn't add to all image. Only the white color region of mask image
became purple! This means only the area of background was changed.
 If you use the new
mask mask2.gif, and add yellow color to test.gif
again, you will get the left result.
If you use the new
mask mask2.gif, and add yellow color to test.gif
again, you will get the left result.